
How to Connect a Washing Machine Drain Hose (Proper Setup to Prevent Leaks & Backflow)
Learn how to connect a washing machine drain hose correctly. Step-by-step guide to prevent leaks, bad smells, and water backflow during draining.
APPLIANCE CARE
2/7/20262 min read
Connecting the drain hose the right way is just as important as connecting the water inlet. A poorly installed drain hose can cause water leaks, slow draining, siphoning, or foul odors. This guide explains how to connect a washing machine drain hose properly, whether you use a floor drain, standpipe, or sink outlet.
What You Need Before You Start
Washing machine drain hose (usually included)
Hose holder or U-shaped hook
Zip tie or clamp
Bucket or towel
Access to drain outlet
Make sure the washing machine is unplugged before starting.
Step 1: Identify the Drain Outlet Type
Most homes use one of these drain options:
Standpipe drain (vertical pipe in the wall)
Floor drain
Sink drain connection
Choose the method that matches your setup.
Step 2: Attach the Drain Hose to the Washing Machine
Locate the drain outlet at the back of the washer
Push the hose firmly onto the outlet
Secure it with a clamp or zip tie
This prevents the hose from coming loose during high-pressure draining.
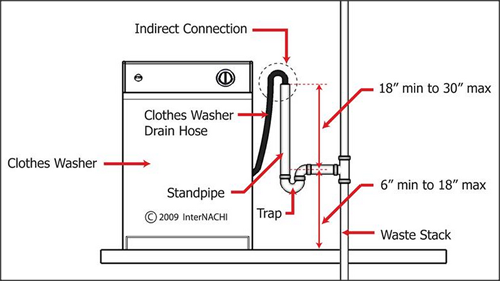
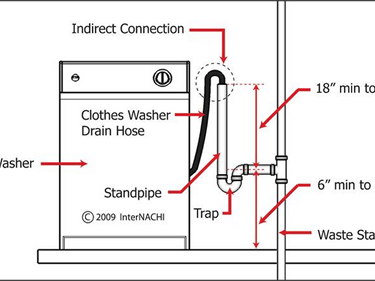
Step 3: Set the Correct Drain Hose Height
Proper height is critical.
Ideal height: 24–36 inches (60–90 cm) from the floor
Too low → water drains out immediately
Too high → poor or no draining
Always follow the height range recommended by the manufacturer.
Step 4: Connect the Hose to the Drain
Option A: Standpipe Drain
Insert the hose into the standpipe
Do not push it in more than 4–6 inches
Leave air space to prevent siphoning
Option B: Floor Drain
Secure the hose so it does not slip out
Avoid sealing it airtight
Option C: Sink Drain
Hook the hose over the sink edge
Secure with a clamp or tie
Make sure it cannot move during draining
Step 5: Secure the Hose Position
Use a hose holder or clip
Avoid sharp bends or kinks
Keep the hose away from heat and sharp edges
A properly positioned hose improves water flow and prevents damage.
Step 6: Test the Drain Connection
Plug in the washing machine
Run a short rinse or drain cycle
Watch for leaks or hose movement
Listen for smooth water flow
Recheck the hose after the first full wash cycle.
Common Drain Hose Mistakes to Avoid
Pushing the hose too deep into the drain
Setting the hose too low or too high
Sealing the drain airtight
Leaving the hose unsecured
Allowing sharp bends in the hose
These mistakes often cause draining problems.
Signs the Drain Hose Is Installed Incorrectly
Washer drains immediately after filling
Water backs up or overflows
Bad smell from the washer
Slow or incomplete draining
Fixing the hose setup usually solves these issues.
Safety & Maintenance Tips
Check the drain hose every 6 months
Replace cracked or brittle hoses
Clean lint buildup near the drain outlet
Secure the hose after moving the washer
Knowing how to connect a washing machine drain hose correctly prevents leaks, bad odors, and drainage issues. With the right height, secure fitting, and proper airflow, your washing machine will drain smoothly and safely every cycle.
Read More:
How to install a washing machine
How to level a washing machine
How to connect a washing machine inlet hose